
Hello dear readers of the blog site Not so long ago, in one of my articles, I promised to talk about how to restore the windows 7 system if any software malfunctions your computer. Such a solution is a way in case of malfunctions associated with errors during the installation of updates, incorrect changes to the settings, as well as during the installation of either your computer or laptop. This approach can fix problems that are slowing down or blocking your computer.
Many inexperienced users, when such a situation arises, resort to the services of paid computer assistance, having given a lot of money. However, you can restore windows 7 yourself without spending a penny.
During the procedure, you may encounter the problem of the absence of a restore point, since the protection for the disk on which the operating system is installed was disabled, and, accordingly, the storage of copies of system settings and previous versions of files was also disabled. In order not to face such a situation in the future, I advise you to read, .
There are several ways how you can restore your windows 7 system with your own hands. I will try to describe them in detail and in an accessible way below.
In the built-in services of the operating system, there are many useful utilities that make it easier to work with your computer, as well as configure and protect it. You can restore windows using the built-in utility only if your computer is not damaged so much that it does not start. If the process of starting the computer occurs in normal mode, but you are sure that you need to rollback, then after loading, right-click on the shortcut My computer and select the item Properties... A window of basic information about your device will open in front of you, where on the left side we select the item System protection, after which it will open additional window System properties, where to press the button Recovery.
Such actions will launch the utility System Restore, where it is enough to press a button Further.

If you did everything according to the instructions, then the result of the correct actions will be the appearance of a new window with a choice of restore points. To display all possible points, just put a tick next to the item Show other restore points. Knowing the date and time when your operating system started to junk, you can select a point that was formed before this event. If you have made your choice, then select it and press the button Further.

After all the manipulations, another window will appear in front of you, in which information on restoring the system will be summarized. If you are using a password to login, then this window has the option to create a password reset media. Although a floppy disk will be written there, but as you understand, no one uses floppy disks anymore, then you may well use a USB flash drive. From the name it is clear what it is for.

The last thing to do is press the button. Ready, after which a message will be displayed on the screen that the recovery process cannot be interrupted. To continue the process, just click the button Yes.
Now it remains to wait for the end of the process, after which the computer will reboot and information will appear on the screen that the windows recovery was successful.
There are situations when the computer, when booting, instead of the usual desktop interface, displays a simple black screen. In this case, you should not be upset, we will come to the rescue . I will not describe in detail how to start this mode, since I wrote a whole article on this topic, which you can read by clicking on the link given above. The essence of this method is quite clear, but for the lazy I will describe the process itself a little.
When the computer boots up, press the F8 key several times, after which a list of additional boot options will be displayed. You can choose any mode, since it is not important for recovery. After you have selected the desired item and pressed Enter, the system should boot into safe mode with minimal settings.
Next, you need to do the same as described in the first method, because when loading safe mode, the system does not change its style of work, but only disables unnecessary files. Actually, everything is clear with this method.
The last and most effective way to restore the windows 7 system is through BIOS. This method will allow you to revive the computer even in difficult situations, it is enough to turn it on.
The only thing that should be at hand is a boot disk or. I described this method in more detail in, but here I will try to describe this method a little. Before starting the process, insert the disk or USB flash drive into your computer. Press the key at regular intervals while turning on the computer. Del or F12 (it all depends on the manufacturer of the computer and the version of the firmware), so you start the BIOS. After loading, go to the menu Boot /BootDevicePriority and choose from which media the system will boot. If you are using a disk, then select DVD, if a flash drive, then USB HDD. We save all the changes and restart the computer. In BIOS, just press the F10 key.
After that, the installer window will appear. Here we select the item System Restore and press Further. If you did everything correctly, you will be prompted to select a restore point.
From my own experience, I want to say that it is best to choose the first successful launch. In this case, all programs that were installed while working on the computer will be removed.
Do not worry about the safety of your personal information, it will not be affected. After the desired point has been selected, press Further, wait for the end of the process and press the button Ready... Actually, the process of restoring the system through Bios is over, it remains only to remove the media from the computer and change the order of the devices from which the boot should be made in the BIOS settings.
So we examined the main ways of how to restore the windows 7 system. If none of them helped you or during the process you have questions that you cannot solve yourself, then be sure to ask them in the comments.
Most PC users are familiar with terms such as Windows and BIOS. However, not everyone realizes that in some cases the operating system can be restored, and it will not necessarily need to be reinstalled. Indeed, reinstalling the OS in some cases can bring invaluable harm to the existing data. And therefore, many will be interested in learning how to restore the system through BIOS. Read about this in our article.
Modern technology is developing rapidly, but most of the principles and methods of operation of technology remain unchanged. Each new version of the Windows family of operating systems receives an improved set of functionality. For example, in the event of a software failure or the installation of any drivers, the system recovery process in a newer OS will be much faster.

At the moment, the system is being restored through the BIOS. Even other types of systems (like Linux) contain an OS restore point. Therefore, it is very important to know how you can make Windows operational after a virus attack or a critical crash. At this point in time, this can be done using an installation disk (flash drive), a special resuscitator, and in more modern versions - from an SSD media or a special section of the hard drive of your PC or laptop.
It should be recalled that Microsoft has ended support for Windows XP since April 2014. However, even in spite of this, quite a few companies (including in the USA, Europe) continue to use the services of this OS. Therefore, the question of how to restore the Windows XP system through BIOS without a disk remains quite relevant. Indeed, even taking into account the good stability indicators of this system, it does not tolerate frequent installations-uninstallations software(especially if it is not certified).
Before you restore the Windows XP system through BIOS, find the installation disk with this system, and then:


Thus, you were able to save yourself from the rather lengthy process of installing the OS. Also, do not forget to enter the BIOS using the method described above and rearrange the method of booting the system from CD-ROM to hard disk.
As you can see, getting Windows XP back up and running is not that difficult. Use our tips on how to restore the system through BIOS and enjoy the smooth operation of your PC as long as possible. In more modern versions of Windows (7 and you can restore the OS in even fewer steps - don't be afraid to use progress products!
Greetings, dear readers.
Computers often fail for a variety of reasons. If this issue is directly related to the operating system, reinstalling is the best solution. But what if there are important files left on the main drive or desktop? After all, when rewriting, everything will be deleted. The solution is a tool like recovery windows systems 7 from disk. This function allows you to return the operating system to work when the latter refuses to boot.
In addition to a malfunctioning computer, we also need a bootable windows disk... And it can be either a plastic carrier or a flash drive. Moreover, it is desirable that this is the same image from which the current shell was installed. After all, otherwise, due to the version mismatch, the process may not go.
If the element from which the current system was installed is lost, try to find it on the Internet on another computer. Download the disc and save it to your hard drive.
After the system image is on one of the partitions, it must be correctly written to the portable device. To do this, use one of the many programs. For example, I like Rufus. The application allows you to quickly cope with the task. It has an intuitive interface, so anyone can create a disc.
There are many reasons why Win 7 can fail so much that it stops loading. To solve the problem, you need to use a tool that allows you to return everything to its place. It runs through BIOS:

It is worth noting that some laptop manufacturers even create special software that allows you to quickly restore the device to work. So, for example, HP offers "Recovery manager", Samsung - Solution. In general, any large company provides these functions.

I hope you can figure out how to use the built-in tool without any problems. Believe me, you can use it to correct a variety of errors.
windwix.ru
BIOS is a global configuration tool operating system... Practice shows that it is best to restore windows OS precisely through the BIOS, especially in cases where no other tricks can help in any way.
Of course, there are situations when it is no longer possible to restore, and often this happens for the reason that the system itself has critical damage, which can be fixed by completely removing and installing the OS.
How to restore the system through BIOS - the necessary tools
To restore the system, you need an installation (or bootable) disk with windows. You can also use a flash drive, as people don't always install floppy drives these days. If the OS image is written to the media, you should check the hash sum, for this it is advisable to install the HashTab addon. The hash sum is recognized in the information for the image, and then it is checked in the properties of the image (already recorded on the medium).

How to restore the system through BIOS


SovetClub.ru
windows is a popular user operating system that powers millions of computers, laptops and mobile devices.
The environment has high performance and stability, but it sometimes fails.
Knowing how to run System Restore will help you protect yourself from the problems associated with such failures.
A restore point is a copy of the system state at a specific point in time. windows is programmed to independently create restore points when changes are made to the configuration as a result of installing drivers, network components, programs, etc. (see What programs are needed for a computer).
Checkpoints are also created every week unless major configuration changes have been made in the previous 7 days.
If desired, the user can create a new restore point with his own hand. This is done without the need to use third-party software products, through the menu standard tool called "System Restore".
To get to your destination, open the Control Panel
go to the System and Security tab.
In this menu, select the System category, from there go to Advanced system settings. Here select the "System Protection" tab.
alternative path - “This computer” → “Computer” → “System properties”
The procedure is saved for all current OS revisions. In windows 8.1 and later, here you can additionally activate / deactivate protection.
To create a restore point, click the button of the same name and enter the desired name. Here are entered Extra options: space allocated for storing recovery points, etc.
The list of copies is available under the "System Restore" tab. If windows starts to behave suspiciously, go to the specified dialog and make a "rollback" to the last working state.
If the computer does not boot, perform a BIOS recovery. To do this, you need a special recovery disc or with a windows installation image.
Follow the steps below:
After waiting for the first dialog menu to appear, click the R button on your computer / laptop keyboard.
A window will open with a list of installed OS. If it is alone, you will be shown only the C: WINDOWS folder (the disk index may differ depending on which partition the OS was originally installed in). Click Enter.
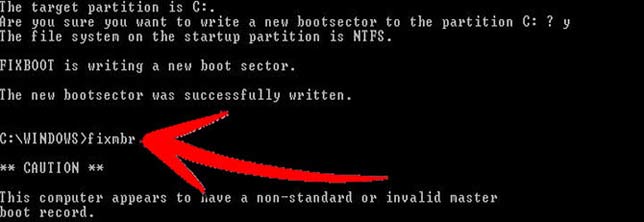
A command prompt will open. You need to enter fixboot. Then click Enter. After that, confirm your intentions by pressing the Y button. The system will start the process of fixing the boot sector. After waiting for the message about the successful creation of the boot sector, enter in command line fixmbr.
Confirm your actions again by pressing Y. The program will create a new boot record. When you are notified that this process is complete, enter Exit at the command line. If everything went well, the device will reboot and start working normally.
After completing the above steps, open the BIOS, find the 1st Boot Device menu there and configure the computer to boot from the hard drive. If you do not do this, the computer will try to boot from the flash drive / disk in the future, which will not have the best effect on the speed of its turning on (see How to increase the speed of your computer).
Having updated to the current version of windows 10, many users were unpleasantly surprised that the restore function is disabled by default here. If you also encounter a similar phenomenon, first of all, activate the recovery function.
To do this, open the "Control Panel", go to the "System" section. On the left side of the dialog box, select the System Protection link.
Going to "Protection Settings" (found by opening Protection and in the Properties subcategory), select the system drive and click "Configure". On the "Recovery Options" tab that opens in the "Protection" menu, activate the function by placing the switch in the appropriate position.
When a notification appears with text warning about the possible deletion of some old points, confirm your intentions by pressing Yes / OK.
Otherwise, the order of restoring windows 10 does not differ from the reanimation of earlier versions of the OS.
Use any of the applicable instructions previously discussed.
In the vast majority of situations, the described recovery methods allow you to bring windows back to life. Along with this, various failures and errors are not excluded.
In the case of using special disc or a flash drive, such problems do not arise: either windows is restored, and you continue to use the computer normally, or simply forgetting about the failures that have occurred, reinstall the OS (see How to install windows on Lenovo).
Errors (they are indicated by a specific index consisting of the letter "x", zeros and additional letters / numbers or a text description) the user has to deal with mainly in cases when Windows boots, and attempts to restore the system are made through the appropriate section of the Control Panel.
Under such circumstances, before resorting to drastic measures (reinstalling the OS), you can normalize work through Safe Mode.
Do the following:
If it does not help, use the previously discussed method of recovering from a disk / flash drive.
Now you know how to normalize windows. The information obtained will help you not only correctly navigate in the event of a malfunction in the operating system, but also save money on the service of third-party computer customizers (see Laptop does not turn on).
Good day!
No matter how reliable Windows is, sometimes you still have to face that the system refuses to boot (for example, the same one pops up), slows down, is buggy (note: all sorts of errors pop up) etc.
Many users solve such problems by simply reinstalling Windows (a reliable method, but rather long and problematic) ... Meanwhile, in most cases, you can quickly fix the system using Windows recovery(fortunately, there is such a function in the OS itself)!
In this article, I want to consider several options for recovering Windows 7.
Note! This article does not cover issues related to computer hardware problems. For example, if after turning on the PC nothing happens at all (note: more than one LED is off, the sound of the cooler is not heard, etc.), then this article will not help you ...
If Windows has booted, that's half the battle :).
By default, system checkpoints are enabled on Windows. For example, if you install a new driver or some program (which can affect the operation of the system as a whole), then "smart" Windows creates a point (ie remembers all system settings, saves drivers, a copy of the registry, etc.). And if after installing new software (note: or during a virus attack) problems arose, then you can always return everything back!
To start recovery mode - open the START menu and enter "recovery" in the search box, then you will see the necessary link (see screen 1). Or in the START menu there is an alternative link (option): start / standard / service / system recovery.

Screen 1. Start Windows 7 recovery
Note! OS recovery does not affect documents, pictures, personal files, etc. Recently installed drivers and programs may be removed. Registration and activation of some software may also fail (at least for the one that was activated, it was installed after creating a checkpoint, with the help of which the PC will be restored).

Then comes the most crucial moment: you need to choose a point to which we will roll back the system. You need to choose the point at which your Windows worked as expected, without errors and failures (it is most convenient to navigate by dates).
Note! Also enable the checkbox " Show other restore points". For each restore point, you can see which programs it will affect - for this there is a button " Search for affected programs«.
When you select a point to restore - just click "Next".

After that, you will only have the last thing - to confirm the OS recovery (as in screenshot 4). By the way, when restoring the system, the computer will be restarted, so save all the data you are working with now!

After restarting the PC, Windows will "roll back" to the desired restore point. In many cases, thanks to such a simple procedure, many problems can be avoided: various screen lockers, problems with drivers, viruses, etc.
An excellent program that does not even need to be installed: just extract from the archive and run the executable file. It can not only scan your PC for viruses, but also restore many parameters and settings in Windows. By the way, the utility works in all popular Windows: 7, 8, 10 (32/64 bits).

Screen 4.1. AVZ: file / restore.
By the way, the list of recoverable settings and parameters is quite large (see the screen below):

This is a difficult case, but we will fix it :).
The most common problem Windows boot 7 is associated with damage to the OS bootloader, disruption of the MBR. To return the system to normal operation, you need to restore them. More on this below ...
Windows 7 is a pretty smart system (at least compared to previous Windows). If you did not delete hidden partitions (and many do not even look or see them) and your system is not "Start" or "Initial" (in which these functions are often unavailable), then if you press several times when turning on the computer F8 key, you will see additional download options .
The bottom line is that among the boot options there are two that will help restore the system:

If nothing worked and the system still does not work- then for further Windows recovery we will need an installation flash drive or disk with Windows 7 (from which, for example, this OS was installed). If it is not there, I recommend this post, it tells you how to create it:
To boot from such a bootable USB flash drive (disk) - it is necessary to properly configure the BIOS (in detail about the BIOS setup -), or when turning on the laptop (PC), select the boot device. Also, how to boot from a USB flash drive (and how to create one) is described in detail in the article about Windows installation 7 - (especially since the first step in recovery is similar to the installation step :)).
Windows 7 setup window appeared ... What's next?

In the next step, we choose not to install Windows, but to restore! This link is located in the lower left corner of the window (as in screenshot 7).

After following this link, the computer will search for OS that were previously installed for some time. After that, you will see a list of Windows 7 operating systems that you can try to restore (usually - there is one system). Select the desired system and click "Next" (see screen 8).


Let's take a look at the steps in order to help return the OS to its previous state ...
See Screen 9
This is the first thing I recommend to start with. After starting this wizard, you will see a search box for problems (as in screenshot 10). After a certain time, the wizard will inform you whether the problems have been found and resolved. If your problem is not resolved, go to the next recovery option.

See Screen 9
Those. roll back the system to a restore point, as in the first part of the article. Only there we ran this wizard in Windows itself, and now using a bootable USB flash drive.
In principle, after choosing the bottom option, all actions will be standard, as if you had launched the wizard in Windows itself (the only thing is that the graphics will be in the classic Windows style).
The first point - just agree with the wizard and click "Next".

Screen 11. Recovery Wizard (1)

Screen 12. Restore point selected - Restore Wizard (2)
Then you confirm your intention to restore the system and wait. After restarting the computer (laptop) - check the system to see if it boots.

Screen 13. Warning - Recovery Wizard (3)
If the restore points did not help, the last thing remains, rely on the command line :).
![]()
See Screen 9
Command line- there is a command line, there is not much to comment on here. After the "black window" appears, enter the two below-presented commands in sequence.
To repair the MBR: you need to enter the command Bootrec.exe / FixMbr and press ENTER.
To repair the bootloader: you need to enter the command Bootrec.exe / FixBoot and press ENTER.
By the way, note that on the command line, after executing your command, the response is reported. So, both teams above should have the following answer: “ Operation completed successfully". If you have a great answer from this, then the bootloader has not been restored ...
PS
If you do not have restore points - do not despair, sometimes you can restore the system like this:.
That's all for me, good luck to everyone and a quick recovery!For additions on the topic - thanks in advance.
Some users in their lives are faced with the need to restore the Windows system. In this article, we will look at what a system restore is, how to do it, and all the additional points of this issue.
What is it for? System Restore can help if your computer stops working properly. This condition is caused by the installation of virus software that makes changes to the PC registry or inept / harmful actions of the user himself.
Windows System Restore- This is the restoration of the state of the OS, files and programs on the computer until the moment when the malfunction began. Sometimes the user misunderstands the meaning of System Restore and means returning to a previous version of Windows. For example, from windows 8 to windows 7. In fact, when the system is restored, its version does not change.
There are many ways to "breathe life" into your operating system, but we will look at 2 of the simplest Windows rollbacks:

It is worth noting initially, windows 7 system recovery can only be performed if the recovery function (service) was launched earlier, before the problems appeared. If it was not enabled, then it will be possible to rollback only with the help of boot disk Windows.
To activate the Windows recovery service, you need to go to the "Control Panel", this can be done from the "Start" menu. Next, we are looking for an icon with the name "System Restore". Next, click on the tab with the name "Start recovery", the system will give us a message - the recovery service is disabled and will offer to activate it.
Usually at the first Windows startup the restore point is saved even if the restore function has been disabled. To see the list of your restore points, you need to click the "View other restore points" button.
If this function has already been launched before, it means that we can immediately start starting the system recovery procedure. Click "start system recovery", select a restore point, click "next" and "done". The recovery process is launched, as soon as it is over, the computer will restart, after which you can start working.
What to do if System Restore doesn't work?
The most common problem is the not enabled recovery service. How to activate it is written above.
Of course, the option of its complete inoperability cannot be ruled out. Very often this can be found if a non-licensed version of windows is installed.
Most likely, you have already entered the System Restore Center, activated the restore service and found that there is no backup point - it means that you cannot choose to which state you cannot roll back the system. Don't worry, your system can still be recovered!
System restore without a restore point can be done using the command line. It is recommended to strictly follow the instructions so as not to break anything. We will look at how to roll back the system using the command line below.
By the way, it is not necessary to use a disk, you can do a system restore from an image by first re-encoding it and writing it to a USB flash drive.

If your operating system isn't quite dead, i.e. it is still loading and working somehow. Or, for example, built in Windows tools System Restore does not help - try using special Windows recovery programs, such as:
1.
- a program that will help you both restore the OS (registry, boot areas, access rights), and scan your PC for viruses and errors in files.
2.
- this software is mainly focused on backing up files, logical disks (partitions), but Acronis can also restore Windows and even Mac OS.
A huge advantage of this method is a successful system recovery even in the most difficult cases, the main thing is that the computer or laptop is turned on.
Make sure you have your Windows installation disc (bootable disc) handy and insert it into your floppy drive. Now we need to enter BIOS. When starting the computer, press the F12 key, go to the Boot -> BootDevicePriority menu - in the first place, select the DVD drive, if you are using a disk, if the USB flash drive is USB HDD.
Restart the PC again, the Windows installer should now start. Often, when the PC boots up, an inscription in English pops up, which requires you to press any key to start booting from the disk. If this is not done, the computer will continue to boot in normal mode after 10 seconds from your HDD, and not from a bootable USB flash drive / disk as we need.
So, we booted from the disk and now in the installation menu, select the item "System Restore", click "Next". After that, you have to select a restore point, it is best to use the first successful launch, but the programs you need may not have been installed there yet. Those. you will lose programs (and data in them) that you installed after creating the restore point. Press "Next" again, now the system will be restored. When the process is over, click "Yes, done." We reboot the system, after removing the disk / flash drive from the drive.
This method is recommended if a system restore point is missing. Again, we need a bootable Windows operating system disk. Exactly the one that is installed on the computer.
You can view the OS version by right-clicking on the "My Computer" icon and going to the "System" tab.
If you have a system restore point, then you just need to boot into the command line mode (for this you need to press the F8 key when the OS boots and select the "Boot in safe mode with command line support" item). Then enter the command "rstrui" and follow the instructions.
1. If the boot sector of your OS is damaged.
Enter “fixboot” on the command line, press “Enter”, then enter “fixmbr” and press “Enter”. Everything, the boot sector of your windows is restored, you can restart your computer in normal mode.
2. If the boot file boot.ini is missing.
Enter "bootcfg / rebuild" on the command line, press "Enter". We answer all possible questions of the system by entering "Y" and pressing the "Enter" button.
3. If you have a corrupted config in the system32 folder.
We insert the disk with your version of the operating system into the drive, enter in the command line "cd repair copy SYSTEM C: \ windows \ system32 \ config", press "Enter", it's done!
4. If files “ntldr” or “ntdetect.com” are missing and the system displays messages like: “NTLDR is missing at Windows startup”.
Enter in the command line "copy J: \ i386 \ ntldr C: \", press "Enter" (Where J is the letter of the important drive, and C is the letter of your system drive on which your OS is installed).
If you do not want to restart your computer, you can restore the system through the command line from windows. We insert the disc into the DVD-ROM, while the computer must be booted. Now you need to start the command line. To do this, in the Start menu, click Run or press the Windows + R hotkey.
We enter the following value there: "sfc / scannow", click "OK" After that, all broken distributions of the system will be copied from the boot disk automatically. System restore, rollback is pretty quick and hassle-free.
I want to note that there are no major differences here. It is possible that there are different versions of BIOS, but there the intuitive interface and the names of the tabs are saved. With this, there should be no problems.
The second point is the BIOS entry key, they differ for these manufacturers. But this is not a problem either, you can see what you need to click on the picture that appears when loading.

Sometimes after a system rollback, when you first start a laptop or computer, a message with this error pops up - this means that the recovery was not completed successfully and strongly recommends trying again with a different restore point.
Try to recover on a different, earlier recovery date. If such an error still pops up, then the problem is much deeper. This means that the problem is with viruses in your system that have corrupted the information about the system restore points.
A program that checks the strength of passwords of system users. This utility is used by network administrators to calculate users with ...


