
Now, probably, even schoolchildren know that a router is a mini-computer and must be configured before use. But with all this, not everyone knows how to enter the router settings. But really, how? For beginners and housewives, this is quite a “Chinese letter”, along with the inscriptions on the Egyptian pyramids! We'll help you figure it all out! At least entering the router will not seem like such an abstruse task for computer geeks. So let's go!
All the settings of a modern Wi-Fi router are collected in one graphical interface, which is called the web interface or web configurator. Many users also refer to it as "router site" or " Personal Area router".
Although this is wrong, it is not devoid of logic. The fact is that in order to enter the settings of the router, you need to use a regular web browser with which you surf the Internet - Chrome, Opera, Explorer or Firefox. So it turns out that you need to go to the router's website in order to configure it and the sequence of actions in order to enter the router settings is as simple as 5 kopecks.
So, great, we have already understood that all this is easy and simple, but we have not yet figured out how to enter the router's web interface. To do this, you need to know its IP address. How to recognize him?! Again, nothing complicated! We take this infernal piece of iron in our hands and turn it over! On the reverse side there should be a sticker-sticker with a bunch of letters and numbers. There is a model, and a serial number, and a bunch of other rubbish like that. Among all this riot of information, we need to find the IP address of the device. This is what it looks like on the sticker:

Usually, an IP address is used to access the router settings, either or. Less common are addresses 192.168.100.1, 192.168.8.1, 10.0.0.1 or some other. Next to it, the username and password for logging in are usually indicated as well. In the example in the picture, this is the login admin and password admin.
On many modern network devices, instead of IP, a text, domain address is used. An example is tplinkwifi.net for TP-Link routers, my.keenetic.net for Zyxel Keenetic, router.asus.com for ASUS routers.

There is no need to be afraid - everything is the same, but in a slightly different form. Everything is used the same way - we launch a web browser (Chrome, Opera, Firefox, IE, etc.) and enter either the IP address of the Wi-Fi router or its URL in the address bar. That's all!
As my experience tells me, very often problems with access to the web interface begin at the very first stage. And it seems that you are doing everything right, the device is working, the lights are flashing, but for some reason you can’t enter the router settings. No, from the word "absolutely". What to do and how to be?! Let's figure it out!
You enter the IP address of the router in the browser, and in response you get the error "Page not found" or "Unable to access the site."

There are several reasons for this. The most common is simply device glitch- try to reboot it and check the entry into the router settings again.
The second most popular reason is banal errors in writing the address of the router. It must be written in the address bar as it is written on the sticker. That is 192.168.1.1 or 192.168.0.1 . Users, on the other hand, usually start to get stupid in a uniform way, inventing something of their own. For example, they replace numbers with letters - like this: 192.168.l.l or 192.168.o.l - of course this will not work! The IP address must consist of numbers, and the system will misunderstand the letters! Sometimes, they manage to forget about the dots in the address - 19216811, or add more parts - 192.168.0.1.1 - this will not work either.
Fairly common problems with network card settings on a computer or laptop. The solution is also quite simple. Pressing the keys Win and R to open the Run window. Enter the open command in the line ncpa.cpl and press the "Enter" key, after which our eyes will see a list of Windows network connections. We click on the one to which the router is connected, right-click and select the "Properties" item:

Then, as shown in the figure, double-click on the line "Internet Protocol version 4 (TCP / IPv4)" to open the third window - network connection properties. There we check the boxes for automatically obtaining an IP address and DNS servers. This should be done in most cases, since the DHCP server must be enabled by default on the router and it distributes IP, which means that the computer should pick it up automatically!
If this does not help, try to register the IP on the network card statically. Like this:

This is in case the DHCP server on the network device is disabled or not working properly. If you suddenly get the error “IP address conflict on the network”, enter a different address - 192.168.1.3, 192.168.1.4, etc.
In the event that none of the tips I listed above helped, try this. Run command line and write the command in it:
Ping
That is, if the router has an address of 192.168.0.1, then the command will look like this:
Ping 192.168.0.1 -t
Press the "Enter" key to run the Ping command. Thanks to the “-t” key, packets will be sent continuously, and not 4 requests, as is done by default. Next, you will need to try in turn to connect the patch cord coming from the computer to all ports of the router in turn.

The whole point here is that modern routers can reassign LAN ports for different purposes - IPTV, SIP telephony, etc. You will not be able to enter the router settings through such a port. That is why it is worth checking the other ports. As a rule, if the device is “live”, then it will respond on one of the ports.
This is the most interesting situation. It is usually found either among absent-minded people who forget everything, or among those who did not set up their own router or modem, surrendering themselves to a third-party tuner or simply entrusting this process to friends, acquaintances, etc.

And the result in both cases is sad - it is not possible to enter the router settings under the default factory password and a login or password error is displayed. What to do? Unfortunately, in 999 cases out of a thousand, the only solution is to reset the router settings. To do this, it has a special “Reset” button, which can be found on the back of the case, next to the connectors. It looks like this:

Resetting the router settings is usually quite simple - press "Reset" and hold for 8-10 seconds. In this case, it is better to look at the indicators on the front panel. As they all light up at once or vice versa - go out, then you need to release the button and wait for the device to boot normally. But ATTENTION!!!- after resetting the settings, your router will again be as if it had just been pulled out of the box and unpacked. That is, for normal operation, it will be necessary to configure it again. But the factory login admin and password admin will work again!
Today, many families have long had a couple of computers or laptops, and sometimes both. In addition to all this, smart phones and maybe a tablet. And, of course, the center of entertainment for each family member is a big one. Up to a certain point, everything usually goes well, while everyone at home uses their devices, but then there is a desire for something more.
This requires a home wireless network. It helps to get rid of unnecessary wires, to be more mobile, of course, makes all media content accumulated by family members available to everyone.
Such home wireless network is organized using a wi-fi router that broadcasts a signal to many devices that support a wireless connection. Or you can join the distribution using network cables, but for this you will need to register IP addresses for each connected device.
For greater comfort of accessing content, use a NAS server. It can be as a separate system unit with several HDD drives, and a ready-made boxed solution. Such a home server allows you to connect any device wirelessly and watch HD video, music, play games and much more, and most importantly, store it all on your disks. The home server is also connected to the wi-fi router.

The most common options for connecting to the Internet
We will consider the 2nd option, with a static IP address. As soon as you select it, the fields for entering the parameters of the static connection - "Setting the WAN IP address" will become active, which must be filled in according to the data received from the Internet provider.

Click "No" and fill in all the fields in sequence.

It is worth noting that in this case the IP address and other network parameters are fixed, they should be entered exactly as indicated by the provider.
If the option with a dynamic IP address is selected, or PPPoE or L2TP, then the setup is simplified and the router will automatically receive all connection parameters from the provider. Only the last two connection types require a name and password provided by the ISP (or, in rare cases, a "Service Name").

Complete the settings by clicking the Apply or Save button.
In some cases, the provider binds the user to the MAC address (physical address) of his computer so that no one else can connect instead of him. In this case, an attempt to access the Internet using a router will become impossible.
To avoid this, the MAC address of the router's external interface should be changed to match the MAC address that your ISP assigned you to (usually the address of your computer's network interface).
This operation is called MAC address cloning, however, this function in the router's web interface does not always have the same name.
To clone the MAC address of your computer that was connected to the Internet by cable before installing the router, enter it in the MAC field of the "Special ISP Requirements" section in the WAN section, Internet connection tab.

Save the settings by clicking the "Apply" button.
To find out the MAC address of the computer and enter it when setting up an Internet connection on the router,
do the following:
1. Click on the computer icon in the task area (tray), click "Network and Sharing Center"
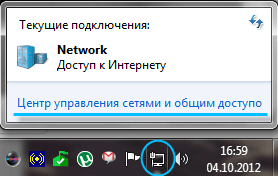
and in the window that opens, select "Local Area Connection".
2. Click the Details button to see the MAC address.

The MAC address will be located in the Physical Address field.

If you did everything correctly and specified the correct connection parameters, then after rebooting the router you will get access to the Internet from the computer on which you made the settings. Open a browser and type
any website address, such as . The site page has opened, therefore, you can proceed
to setting up a wireless network (wi-fi).
In the menu of the web interface of the router, select the "Wireless" section, the "General" tab.

Please note that some routers support wireless network operation in two bands at once (5 GHz and 2.4 GHz). Customize wireless network in the more popular 2.4 GHz band.

Specify the wireless network operation mode. The best way- A universal setting that ensures compatibility with both new and old versions of the Wi-Fi standard. It is called "Mixed" or "Auto" (automatic mode).

Specify the network SSID (Network name that will be displayed during scanning) in the field of the same name. Select the security option in the "Authentication Method" field, I recommend WPA2-Personal, why, read in the Wi-Fi section. Enter a password (or key) in the WPA Preshared Key field. Given key and network name (SSID) will be required to set up access on your wireless devices, so it is recommended that you save them to a file or write them down somewhere in a safe place.
It is recommended to hide the SSID so that your home wireless network was not visible from the outside, but you can still connect to it, since you already know the SSID. To save the settings, click on the "Apply" or "Save" button. By the way, the wireless network in the 5 GHz band is configured in the same way.
Attention! Be careful when updating router firmware. The need for it is due to the incorrect operation of the router and communication problems. Carefully read the update section of the user manual software router and strictly follow the recommendations. Updating the firmware of the router is a last resort, you should not resort to it unless absolutely necessary, since there is no such need during the initial setup of the wireless network.
P.S. I would be very grateful if you point out those points that need to be analyzed in more detail.
Insert an internet cable into the WAN (or Internet) port of your router (aka router).
Connect the router to the computer: insert one end of the network cable into any of the LAN ports of the router, and the other end into the PC network card connector. Instead of a cable, you can use a wireless connection, but it is better not to do this during the setup phase.
Plug the router into an outlet. If your device has a power button, press it. Then wait one or two minutes for the router to boot up.
If your router was pre-configured by the provider or received the settings in automatic mode, then the Internet can work in a few seconds after connecting the router to the PC.
To check, launch a browser and try opening several sites. If there are no problems accessing web resources, you can skip the fourth paragraph of the article.
In the address bar of your browser, enter 192.168.1.1 or 192.168.0.1 and press Enter. One of these IP addresses should lead to the router's settings menu. If both options do not work, find the correct IP address in the documentation for your router model and try entering it.
When the settings login page appears in the browser window, the system may request a username and password. Most often, during the initial connection, one word is suitable for both fields - admin. Less often, router manufacturers use a combination as a standard password. 1234 .
If necessary, you can find the login information in the instructions for the router or on the provider's website. Well, or try an alternative.
If the Internet is still not working, the router needs special settings. Which parameters you need depends on the specific device model and Internet service provider. There is no universal configuration. To get the instructions you need, check the provider's website or request it from the support service.
Once you've got a setup guide for your model, follow its prompts. If in the process you set up both an Internet connection and a home Wi-Fi network, you can skip the fifth paragraph of the article.
To Wi-Fi, it is important to choose the right security settings.

In the settings menu, find the section responsible for the wireless network (see the documentation for your router model). Here, be sure to set a strong password (you will need it to connect your devices to the router via Wi-Fi) and select WPA2-PSK as a means of protection.
Just in case, it is better to restrict outsiders' access to the router's settings menu. If the router is still protected by the default password, replace it with your own.
Find the settings section that is responsible for the security (see the documentation for your router model) of the device, and enter a new strong password here. Save your changes.

If your computer has a Wi-Fi module, after completing the settings, the network cable can be pulled out of the PC and connected to the router via a wireless connection.
Ideally, the router is in the center of the zone in which you use Wi-Fi. Thus, the signal will be equally available to all connected devices.
The fewer walls, furniture, and other obstacles between the receiver device and the router, the better the wireless network works.
Hey! Today I decided to write a short article in which I will tell you what mistake is most often made when setting up routers on your own. What problems appear later and how to fix it. Where do I get all this information from?
Look now a little to the right, in the right column of the site. You see, there is the total number of comments that are left on this site. I don’t know what number you see there now, but at the moment it’s almost 9000 comments (to be precise, 8894).
Almost all comments are questions that I had to answer, give some advice, give a link to the desired article, etc. What am I getting at, these comments are a great source of unique information both for me and for visitors to this site. These are unique cases, I would even say vital problems :).
Also, most of these comments relate to problems that arise in the process of setting up and operating routers, wireless adapters, Wi-Fi networks, etc. So I drew some conclusions from these comments, and even from articles that relate to this most popular mistake.
Yes, this is the most common problem. I wrote about her in an article. By the way, the article is also no less popular :).
Why does this problem occur and why is it the most popular?
It usually occurs due to the exact fact that when configuring the router incorrectly indicate the parameters provided by the provider.
Also, pay attention to binding by MAC address. If the provider does it, then do not forget to clone the MAC address in the router settings. Only clone from the computer to which the Internet was attached.
Also, in the properties Wireless network connection , or LAN connection v Internet Protocol Version 4 (TCP/IPv4) you need to set to receive IP and DNS automatically.
Here is the most common mistake and its solution.
If you have a provider for which a special connection was created on the computer before installing the router, and after installing the router, the Internet works only on one computer, or works while this computer is turned on, then something needs to be clarified.
You see, the router itself must establish a connection to the Internet, not the computer. On the computer, you need to delete the previously created connection. And in the properties of the network adapter, set to receive IP and DNS automatically.
All parameters that the provider provides are specified only in the router settings. Connection on a computer, if you have a router, is not necessary.
I also wrote an article on this issue.
I don’t know how useful this article was for you, but I hope that I didn’t waste my time.
Before setting up a router, the main thing is to understand how it works and specify correct settings given to you by your ISP when you connect to the Internet. If you do not know what parameters to specify and what to choose, then just call the provider and ask.
As always, ask questions in the comments, we will understand. Best wishes!
Welcome to my article! So, you bought a router and now it's time to start setting it up. But there are still so many steps to the final result - you need to install it correctly, connect it to all the equipment and configure it. But what if you don't understand it? My course for a young fighter is setting up a router for dummies.
Attention! The article proposes a general router configuration model for all devices. I strongly recommend that you find an article on our website for your model and make settings for it. I offer a list of the most popular models for which we have instructions on how to set up:
And even if your model is nowhere to be found, it's okay. The configuration process itself is almost the same everywhere (you will see this below) for any router model. In addition, there is no difference in your Internet provider. Let's just say, if your ISP's cord successfully enters your router, everything will be fine) Let's go.
So, in order to make the Internet work successfully through a router, for any model, you need to take approximately the following steps:
Everything! Now let's go over each item in more detail in my step by step instructions. If something is not interesting or not needed, just scroll using the Contents of the article to the desired section. But you can first watch the setup video:
We begin to disassemble the primary steps for installing a router.


There should not be much difference between setting up a router using a computer, laptop, phone or tablet. The router has a standard web interface, which will be the same for all devices. Just like your favorite sites.
The main thing after these points is to have any connection with the router - whether it be by wire or by air.
All settings of any modern router are made through its web control panel. This is an analogue of the site that works on the device itself. So you need to connect to it like a site - through a browser.
The data for accessing the control panel of a particular router is usually located on a sticker at the bottom of the router. Required - connection address, login, password.

Usual connection addresses for most modern models:
192.168.0.1
192.168.1.1
We follow these links, and most likely in one of the cases you will be taken to a panel where you will be asked for a username and password. Factory login and password you already know where to get it. If not, look on our website for your model. The usual most General settings for almost any router model, these are:
Login - admin
admin or empty

What needs to be done to continue: You must log into the router's control panel.
Note. Your device must be set to automatically receive addresses. Otherwise, you may get an IP address on a different subnet and not be able to connect to the settings. If the connection fails, this is the most common problem. Write in the comments! Let's fix it.

Now let's move on to setting up the Internet on the router. Of the most important, if you have successfully completed the previous steps, we will definitely need the provider's login and password to connect to the Internet. You can find it in the contract - so it's time to look for this paper.
Almost any modern router has a setup wizard that will guide you step by step through all these steps - setting up the Internet, setting a password for Wi-Fi, changing the password of the router itself. Many routers place it on their home page. They usually have names like "Quick Setup Wizard", " Quick Setup” or “Quick Setup”. Look for something like this. For me it looks like this:

Don't be afraid to walk through the steps on your own. I will leave notes below on some controversial points, but anyway, on any router model, you will be asked about the same thing. So you did it once and learned for the rest of your life!
One of the important points is to choose the type of connection. It depends on what is written in your contract. Usually there just indicate these technical points. The most common is PPPoE, there is a Dynamic IP address and a Static IP, L2TP, PPTP. The main thing here is to choose your type (but usually we have PPPoE with Rostelecom), enter your login and password - that's all, this is enough for the Internet to appear on all devices automatically.
Usually the settings are in the WAN section. I show you my working ones, you need to enter your own login and password.

In the case of dynamic The IP address where the Internet provider is tied to the line - the Internet will appear immediately after connecting the router. Check if you already have it? Maybe nothing needs to be configured?
If you can't connect to any, just call your provider. They are great at giving advice over the phone and helping you solve your problem. Especially with the internet. Do not be afraid!
: Working Internet on wired devices. Possibly over Wi-Fi.
Another important step that occurs with wireless routers. The main point of this setting is to either start Wi-Fi (if it suddenly did not start at the factory settings), or change the network name and password so that it is both understandable and safe. Here are the main settings:
These settings can be located both on one tab and on several, like mine:


Don't forget to save all changes. And it happens that you change the sea of \u200b\u200bvalues, forget to save in a hurry, and then you wonder why it all doesn’t work. After saving, it usually throws it out of the network - after all, the network name becomes different, so you have to restart again with a new password.
What needs to be done to continue: The device is successfully sharing Wi-Fi. Everyone is calmly connected and using the Internet.
Remember, at the beginning you went into the router settings with a default password? So any neighbor can do the same, and there they can already see the password for your Wi-Fi, or even worse, redirect you to bad sites. Do you want this? And so I think not. So let's change the password!!!
This is usually done in a special dedicated section with the appropriate name. I have so:

As you can see, it will be possible to change both the username and password at the same time - these are excellent basic security settings for any person.
For the reading haters, watch everything in the video again. You might find something useful for yourself:
That seems to be all the most important steps - then it remains only to use your Internet on all devices on your home network. And if you suddenly have any problems - be sure to write in the comments. If everything turned out well, write too, it is very important for me to hear your opinion.
Here I will also note interesting optional router settings. On all modern routers, they are no longer critical (I have already painted all the necessary ones above), but suddenly they will be needed. Usually each of them is located in the corresponding section:
If something didn’t work out for you during the setup process, and you can’t do anything, don’t panic, but reset the settings to factory settings. To do this, press the Reset or Reset button on the back of the router. Usually the button is in a recess, you can get it with a needle or something narrow. Sometimes you take not a new, but an old router - and there may be other people's settings. So it's a panacea.

There can be a lot of problems, and it is impossible to predict everything. Here I will just highlight the most common ones:
That's all. Set up and enjoy!


.jpg)


