
And so, you have a pleasant evening at the computer - play, chat, surf the net, and Windows quickly executes your commands. Everything is fine! Idyll! However, do not think that this will always be the case. Know: the insidious Windows is preparing a trick for you. She is just waiting for the moment when some urgent business overtakes you in order to ... show you a fig. More precisely - do not boot.
Windows boot failure is an ordinary phenomenon, but according to the law of meanness, it usually happens when a computer is really needed. So that the situation does not take you by surprise, it is important to prepare for it in advance. Let's talk about what to do if Windows 10 does not load, why this happens and what each user should have in order to solve this problem as quickly as possible.
Hardware reasons for not starting Windows 10:

So, in order to restore the normal start of Windows, the computer must be loaded into the recovery environment. If you have previously used Windows 7, then you know that this very environment is installed on disk along with the main system. And in order to enter it, you need to open the menu of additional boot methods (by pressing F8 after turning on the computer) and go to the section " Troubleshooting».
The top ten also has a recovery environment, but since its boot time has significantly decreased compared to Windows 7, the interval when you can call the boot menu has also become much shorter. The chance to have time to press the desired key at this time (more precisely, the combination of F8 and Shift) remained only in one case: if the system is installed on an MBR standard hard disk and the fast start option is disabled in the power settings of the PC or laptop. If the system is on an SSD or GPT hard drive, you will need bootable media.
For disaster recovery of Windows 10, it is optimal to keep its official distribution on a DVD or flash drive, and the same bit depth as installed on a PC. As an alternative, you can use the boot utility package MS DaRT 10 (Microsoft Diagnostic and Recovery Toolset for Windows 10 ).
Distributions of MS DaRT (in the past they were called "ERD Commander") are officially distributed only by paid subscription, but they are easy to find on the net. For example, on torrent trackers. Windows 10 images are available for download from the Microsoft website.
As an example, I will use the home release of the “tens”, recorded on a bootable USB flash drive, since it has everything you need.

The failure option shown in the screenshot can be considered relatively favorable. Clicking, " Extra options» you will be taken to the recovery environment installed on your hard drive, and you will not have to boot into it from external media. But we will consider a more severe case, when the system does not show any signs of life.
Connect the media to your computer, reboot, and make it the first boot device.
The window that you will see first after booting from a USB flash drive (DVD) will prompt you to select the system language. If Russian is selected, click " Further».

Next, you will be prompted to proceed to install or restore Windows. Click " System Restore».

On the screen " Choice of action» click « Troubleshooting". Here you are right there.


Clicking on the first item launches, most likely, the recovery utility you already know. It is enough to select the date and time for which you want to rollback, and follow the instructions on the screen.

To use this option, you must have at least one saved checkpoint and a properly functioning system restore function. If the latter was disabled before the failure, skip this step and try other methods.


If the rollback to the checkpoint and auto-recovery at startup (the first and second options) did not give the desired result, the console utility often helps to increase the load of the "dozens" BCDBoot. It recreates the hidden "System Reserved" partition and copies the boot files from the Windows directory to it.
For BCDBoot to work correctly, you must specify the location of the Windows folder on your hard drive. To find out, you can use the utility diskpart, but I think it's more convenient to do this through the explorer.
So, to get into the explorer, open the command line and run notepad in it ( notepad).

While in notepad, go to the menu " File”, choose “ Open' and go to the folder ' This computer". Next, let's go through the partitions of the disk and determine which of them contains the system directory. In my example, this is drive D.

Then we return to the command line and execute the instruction:
BCDboot D:\Windows

Please note that your path to the system folder may be different.
In 80% of cases, this is enough for the "ten" to be able to start normally. But in about 20% of cases, the command does not work correctly - it does not restore all boot files. To help the utility a little, before executing the instructions on the command line, you need to format the reserved boot partition (in my example, drive C) in FAT32. This can also be done using diskpart, but I find it more convenient to use File Explorer.

The following two console commands recreate the boot records for the entire drive (MBR) and the system partition (VBR). They are used to solve problems with starting Windows on MBR disks.
Execute the commands one after the other in this order:
bootrec /fixmbr
bootrec /fixboot

If you accidentally execute them on a GPT disk, nothing bad will happen.
In some cases, startup problems arise due to damage not to boot, but to the main system files, for example, after a virus attack. As you may know, there is a special utility for fixing them in Windows. Sfc.exe. So, thanks to the command line, it can also be run in the recovery environment.
The command to find and fix errors in protected system files in the recovery environment looks like this:
sfc /scannow /offbootdir=D:\ /offwindir=D:\
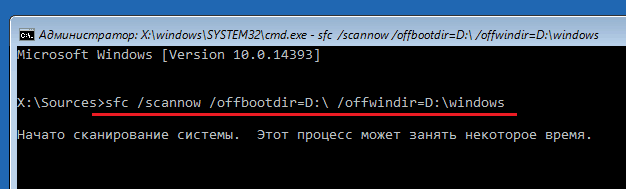
Parameter offbootdir defines the location of the main boot partition (in my example, as you remember, this is drive D), and offwindir– path to the system folder.
Using the command line, you can also fix registry errors on an unbootable system. But, unlike the previous instructions, this requires certain experience and qualifications, because the user needs to know exactly what to correct and how the erroneous entries should look normal.
I will not dwell on registry errors that cause Windows 10 to fail to boot, as this is the topic of a separate large article. I will describe only the method of launching the editor regedit.exe in the recovery environment and open the registry files in it so that you have the opportunity to fix the errors that you know about.
So, to start the editor, we write the word on the command line regedit and press Enter.

You will see that some kind of registry is already present in the utility window that opens, but not the one you need. Before us is our own recovery environment registry, and we are interested in the main system.
To load Windows 10 registry files into RegEdit, select the section in the left half of the editor window HKEY_LOCAL_MACHINE or HKEY_USERS, open the menu File” and click the item “ Download hive».
In the explorer window that opens after that, go to the folder D:\Windows\System32\config(your drive letter may be different) and select the desired file.
Files without an extension in the \System32\Config folder are the components (bushes) of the Windows 10 registry. The main ones are circled.
Give the hive any friendly name (it will be temporary until you unload it) and click OK.

Next, open the section into which we loaded the bush, and here it is in front of us, available for editing. In my example, this is the registry file software, which I temporarily renamed to soft_win_10.

After making edits, go back to the editor menu " File» and press « Unload bush».

When reverting to a previously installed build, the user's personal files will remain intact, but everything done after the upgrade will be undone.
If you are an exception to the rule and a happy owner of a relatively fresh backup, select the item marked in the screenshot in the list of options,
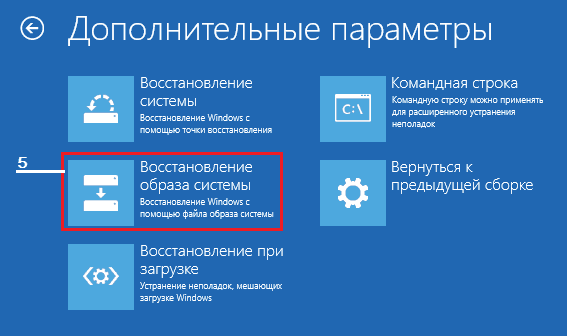
tell the recovery program where to store the image and follow its instructions.

All data of an inoperable OS will be replaced with healthy copies from the archive. If it contains user files, this will also affect them.
Happy recovery!
As a rule, Windows 10 diagnostic mode (formerly called safe mode) starts automatically when the operating system does not shut down correctly, as well as during various Windows failures.
I would like to note right away as a Windows installer specialist - this mode has undergone significant changes in 10-ke. There has never been such extensive diagnostics and recovery tools in Windows operating systems.
That is why, let's take a closer look at how to work in diagnostic safe mode in order to be able to restore Windows 10. Preparing for such tasks will always come in handy for advanced users and system administrators.
How to enter safe mode in Windows 10? In previous versions of Windows, you could start Safe Mode using the F8 key. And now, in order to start the diagnostic mode in Windows 10 manually, you need to do the following:
In the window that opens, go to the "Recovery" tab, then "Special boot options" and click the "Restart now" button; 
Windows 10 is forced to reboot;

After we have started a forced restart of the computer in a special boot option, the Windows 10 system does not boot, but a blue “Choose an action” window appears, where we need to decide and choose from the options: 
We open the 2nd tab, the "Diagnostics" window opens in front of us. Here we can also select tasks from 2 options: "Reset the computer to its original state", "Advanced options". Consider all cases of the development of events, first select "Return the computer to its original state"; 
Everything is clear here without comments, so we proceed to study the “Advanced Options” tab, to select which we press the button with the arrow in the upper left corner. 
There are a lot of useful utilities in the "Advanced Options" tab, using which you can revive the Windows 10 operating system. Let's take a closer look at this entire gentleman's set of system diagnostics!
Now let's open the System Restore tab and see what's there. So, we select the account under which we want to open the recovery process, in the next window we enter the password and click the "Continue" button, the "Restore system files and settings" window opens. And we see that there are no restore points on the system drive. By default, "System Restore" is disabled, it must be enabled in the "System Protection" tab, which I will discuss in detail in the overview article "System Restore". 


As the owner of a computer with Windows 10, you have repeatedly witnessed the fact that the "ten", although constantly being improved, is a rather crude operating system, and a lot of problems arise in it. Developers solve only the most common problems by implementing fixes in service packs or releasing out-of-order patches (fixes) to get rid of a specific error. So, for example, it was with When there are special cases that concern only a computer with certain hardware or software, Microsoft offers to use an integrated tool for troubleshooting.
Diagnostics of a computer with Windows 10 begins with the launch of the tool, which contains a mass of tools designed to find and fix errors that have occurred on the PC.
Note that Windows 10 includes about 20 tools designed to identify problems and then fix them.
Tools are launched through the "Control Panel".
The principle of operation of any component is as follows: it checks the current system settings and compares them with the default settings. When mismatches are detected, the user is notified of this and prompted to reset Windows 10 settings to their original state or somehow change automatically to fix the problem. This is how Microsoft diagnoses and fixes issues with running software.
The conflict resolution tools are divided into several categories, many of which also include subcategories.


After starting the search for problems, the utility will scan the system and display a list of applications installed in it. In the window, you must select the problematic program and click "Next" to run diagnostics in order to identify the source of the conflict.


The funds include:
As you can see, the set of tools for troubleshooting and returning the computer to a state of normal functioning in Windows 10 is large. Another issue is their effectiveness. But here all the responsibility lies on the shoulders of developers with more than 20 years of experience in creating operating systems.
In any case, these tools have more than once saved beginners from doing a hard reset or completely reinstalling it.
To make it easy to find the application you need, all tools can be displayed in one window without sorting by category. The button "View all categories" is responsible for this.

Nothing is required from the user to use the diagnostic tools. The functioning of each element is accompanied by the launch of a wizard window with hints, a couple of buttons and the presence of switches (checkbox, checkbox).

The only thing to do after identifying the problem is to apply the recommended fix for it.

Be careful, the application will require administrator privileges to change some settings. Such functions are distinguished by the presence of a blue-yellow shield icon.

Windows 10 has new troubleshooting and troubleshooting features that allow you to detect a problem before you even start your computer (in preboot mode).
To bring up a menu with a list of available tools, restart your computer while holding down the Shift key. After rebooting, on the action selection screen, click "Troubleshooting".

There are two options available here: Reset your PC (reset Windows 10) and advanced options.
In the additional parameters, there are tools that allow you to restore the health of Windows 10 by:

As you can see, Windows 10 is distinguished not only by the presence of errors and problems, but also by a set of tools for eliminating them and returning the computer to a working state, sometimes without requiring almost any activity and knowledge from the user.
(Visited 26 077 times, 1 visits today)
One of the undoubtedly indispensable tools of the Windows 10 system is diagnosing and troubleshooting your computer. Consisting of several child tools, this application makes it easy to solve system problems - from sound glitches to fixing network adapter errors. But how to use this useful utility "to its full potential"?
The Windows 10 PC Diagnostic Tool consists of 20 tools that identify and fix problems in your system.
In the Search bar, enter "Troubleshooting" and open the found item.
We need a highlighted item in the results
Diagnostics is as follows: the running component checks the state of the system at the moment and compares it with the default initial state. If differences are found, the tool informs the user about this and offers to “roll back” the system to the original settings.
After switching to the Troubleshooting tool, we see a window in which 4 sections are available to us.
Sections and settings available to the user

Now more about how to work with the tools. Consider the example of fixing problems with sound.
Diagnosing audio problems
All we have to do is apply the fix
Sometimes administrator rights are required to apply the settings (select the "Run as administrator" item).
Setting Administrator Rights
Some users do not like the fact that the notification area (the area with small icons in the right corner) is often crowded. Among others, this zone can be occupied by a diagnostic program. How to remove the annoying icon?

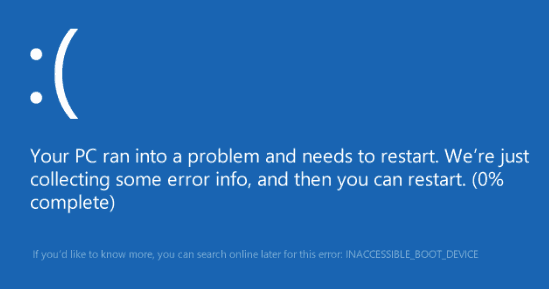
Surely most of you are familiar with the blue screen at startup. The text on it begins with the words "There is a problem on your PC ...".
A picture familiar to most
Why does it start
One of the most common reasons for such a failure is incorrect installation of system updates. Perhaps you did not have enough patience, and you turned off the computer at the inscription “Do not turn off. Updates are being installed "or it happened due to a voltage drop. In any case, this inscription is not accidental, and at the moment the system needs an update adjustment. For those users who are afraid to get into the operation of the system on their own, we advise you to take the computer to a service center. But if you want to try to do it with improvised means, we work according to the following instructions.
For the next steps, we need to boot through safe mode.
We need the "All Options" tile
In the window that opens, we need the item "Updates and Security".
Item "Updates and Security"
Now select the "Recovery" item and in the "Special boot options" click on "Restart now". We wait.
Select "Special Boot Options" and reboot
When the computer boots, we get into safe mode. Select "Advanced Options" and here the "Download Options" tile. As is clear from what is written on the screen, we need to press F4 to boot in safe mode. We press.
Everything is described in detail on the screen.
Now is the moment of truth. If the download went well, then the problem causing the blue screen is in the software part. Then here, in safe mode, check the computer's device drivers (if there are any outdated ones) and view the list of programs - we are interested in suspicious programs whose installation date coincides with the date the problems appeared in the system.
If the blue screen also interfered with booting in safe mode, the system warns us of a serious hardware problem that needs to be solved at a service center or by reinstalling Windows.
There are several ways to do this:

In both cases, we get to the "Windows Memory Checker" window. Here we select the option we need.
We have two options for running diagnostics
The RAM check will start after the system reboots. You will need to wait for some time, during which the screen will display the current verification statuses. At the end of the check, the system will be restarted again. The diagnostic result can be viewed by clicking on the "Memory Checker" icon in the notification area in the lower right corner of the screen.
Before you start solving network problems through system tools, make sure that there are no network outages on the part of the Internet service provider. Try restarting your modem and/or router. If the problem persists, then you should turn to the easiest way to solve network problems.
In the lower right corner, we look for the icon of your connection, right-click on it and select "Diagnostics of problems" from the context menu.
Choose your problem type
After selecting your problem type, simply follow the on-screen instructions.
One of the most common causes of network problems is an outdated network device driver. In this case, you need to update it.
Select "Device Manager"
We need to select the network adapter we are interested in
In the list of available adapters, we are looking for the one that responds to the Internet connection (in the picture this is the second Realtek).
In the context menu, select "Update driver", and in the window that opens, we agree to automatically search for updated drivers.
Select the first menu item
Now follow the instructions on the screen and, when finished, close the setup wizard.
Problem solved.
What should I do if I have problems with the troubleshooting wizard? Sounds weird, but it happens more often than you think.
We need to restart one of the system components. Before proceeding with the following steps, make sure that you are running as a system administrator.

Looking for .NET Framework 3 version in the list
Ready. You can run the troubleshooter again.
To solve regular situations and problems with the system, the troubleshooter is the most suitable option. There are many third-party programs and utilities, but as a rule, Windows 10 deals with failures on its own. Everything that you cannot fix at home becomes the concern of the service center. We remind you: if you are not sure that you can master the work with system files and settings, it is better to immediately take the computer to the master. Stable work to you!
Windows 10, despite all the developers' assurances about the versatility of the system, as well as its predecessor, is not immune from critical failures. One of the most annoying is the appearance of an endless loading of Windows 10 with the issuance of some messages, the occurrence of blue screens or without it. What is the reason for this behavior of the system and how to fix the problem that has arisen, then we will try to figure it out.
Alas, it is not immediately possible to say exactly why the operating system falls into a cyclic reboot.
Of course, in the event of failure messages or indication of failed components in the description attached to the blue screen, one can partially guess what caused the constant restart. However, the most common reasons why Windows 10 endless loading starts again and again are considered to be hardware problems (hardware failures), damage to the system components of the bootloader, problems installing the latest updates, etc. It is possible that such behavior of the system could affect and problems with the "Update Center" itself. Also, sometimes a cyclic restart can be triggered by incorrectly installed user applications (most often in the form of pirated copies or unofficial assemblies) and even virus exposure.
To begin with, let's look at hardware failures associated with the incorrect functioning of the installed equipment, as a result of which a blue screen first appears, in which a description of the failed driver is usually present, after which the endless loading of a Windows 10 computer starts. In this situation, the hard drive, RAM are considered the main culprits and video card. To troubleshoot, first of all, check the tightness of the connection of all the hard drive cables, as well as the correct installation of the graphics adapter or memory sticks on the motherboard. If a visual inspection does not give anything, try removing the RAM strips one by one, turning on the computer again each time. If at one point the download goes well, the bad bar will have to be replaced. If you have bootable media with programs like TestDisk for checking the hard drive, Memtest86+ for testing RAM, or similar utilities, perform a full check of these components using them. This will pinpoint the exact cause of the failure.
But as practice shows, the greatest number of such situations is provoked by damage to important system components. In the case of an endless loading of Windows 10, force shutdown the computer or laptop and then turn it on to activate the start of the automated recovery tool. It is possible that turning off and on will have to be done several times. When the rollback starts, the system (unless critical damage is found in it) will be restored. However, quite often you can’t count on such actions, because when you try to restore, you still receive a message stating that the computer was not booted correctly.

In this situation, do not immediately press the restart button. If there is an active advanced options button nearby, use it, and then try loading Last Known Good Configuration or entering Safe Mode. After that, you can fix some problems.
If you succeeded in starting in Safe Mode, go to the configuration settings (msconfig) and set either diagnostic startup using the general tab for this, or set the safe mode options on the boot tab using either the minimum configuration or Active Directory recovery.

You can start the recovery environment from the command line by typing the “reagent.exe / enable” command, but if encryption of the system partition is enabled, it may not work, so you will first need to deactivate Bitlocker using the corresponding section in the Control Panel.
When using the blue horse with the selection of additional options mentioned above, you can try to get rid of the system going into a cyclic restart using the boot recovery item, which is available in the list after selecting diagnostics.

It is possible that problems will be identified and dealt with automatically.
In case of damage to the bootloader, which is most often observed, none of the above results will give. Therefore, it is strongly recommended to boot from a removable media with a distribution kit or using a LiveCD, call the command line, and then use the Bootrec.exe tool, adding the “/FixMbr” attribute separated by a space, and then “/FixBoot” (without quotes).

If the problem is not resolved during the restart, you will have to completely rewrite the bootloader by adding the “/ RebuildBCD” attribute to the main command, separated by a space, and then reboot the system again in normal or safe mode.
Since endless loading is very common after updating Windows 10, the most reasonable solution would be to remove them. To do this, if possible, it is better to use Safe Mode, go to the Programs and Features section in the Control Panel, and then remove the latest installed packages one by one from the installed updates section.
Note: You don't need to delete everything. It is enough to uninstall the packages one by one, checking the system's performance after the restart, and when a failed update is found, when manually searching for updates again, it will need to be removed from the installation list. Also for such purposes, you can use a utility from Microsoft called Show or hide updates.
But it also happens that the system seems to be working, but updates are not installed. The endless download of Windows 10 updates is almost always associated with problems with the Update Center itself. First, look at the startup type of this service in the corresponding section (services.msc).

The Update Center, Delivery Optimization, Windows Modules Installer, and Windows Installer services must be active. If some component is not active, launch it in the parameter editing window, and in the start type, set the value to automatic start.
Also, to fix problems, you can use the command line, run as administrator, with the update service restarted. First, the commands "net stop wuauserv" and "sc config wuauserv start= disabled" are executed, followed by a full reboot, and after that the activation is performed by the commands "net start wuauserv" and "sc config wuauserv start= auto". If this approach does not work, try looking for an automatic solution in the "Troubleshooting Center" by calling it from the "Control Panel".
Sometimes the problem may not be in the system, but in the installed program. For example, endless loading of Windows 10 with NFS Underground 2 is very common. In other words, the installed game itself provokes a crash. Apparently, this only happens because not the official, but the pirated version is installed. To fix the problem, you need to download the official release or at least replace the speed.exe game start executable file with the original one. Also, some experts recommend launching the game in compatibility mode with Windows versions below the tenth (if possible, even XP, and if this option is not available, then using the previous system modification).
Finally, do not be too lazy to write some bootable antivirus like Kaspersky Recue Disk to removable media, boot from it and perform an in-depth scan of the computer, marking everything that is in the list of items to be checked. Perhaps the problems with booting the system were related precisely to the viruses that had penetrated the computer.


