
Hello! Not long ago I wrote articles about which can be seen on a computer with Windows 7, and in Windows 10 and Windows 8. These are the same errors that appear very often. When they appear, the result is the same - the Internet does not work, sites do not open, etc. People encounter these problems most often when setting up a router. In the articles linked above, I mainly wrote about solving these errors on the computer itself. That is, he described those cases when it was the computer or laptop that was to blame.
But according to my observations, most often the Wi-Fi router is to blame for problems with the Internet. Errors “No Internet access” and connection “Limited” are no exception. It's very easy to check. If you encounter such a problem, then simply connect another device to your router. If the Internet does not work on it, then the problem is in the router or Internet provider. We call the provider’s support and find out if they have any problems and if you have paid for the Internet. If everything is ok there, then the router is definitely to blame.
And if there is no connection to the Internet when setting up the router, then I can say for sure that the problem is definitely in incorrect settings, incorrectly connected cables, or the router is simply faulty (this happens too).
Now we will look at the settings that need to be checked first.
If you set out to configure the router yourself and are faced with a problem where there is no Internet connection, then do not rush to call a specialist. It doesn't matter what router you have: Tp-Link, D-Link, Asus, Tenda, Linksys, ZyXEL, or some other. I think that you already tried to configure something there, and it seemed like you did everything correctly, but for some reason you saw something like this error (icon may be slightly different):
If you have already configured something and are not sure that you did everything correctly, then I advise you to reset the settings on your router so that they do not interfere with us. Find the Reset button on the case (usually it is recessed into the device body), press it and hold it for 10 seconds. If you don’t know how to do this, or it doesn’t work, then continue setting up without resetting, or write in the comments, I’ll give you a link to the instructions.
Next, it is very important to check whether you have connected everything correctly. As a rule, the router has 4 LAN connectors- for connecting computers, TVs, etc. to the Internet and 1 WAN connector. We connect a cable from an Internet provider or an ADSL modem to it. It is very important to connect the Internet to the WAN connector, otherwise, the Internet will not work and the error “No Internet access” will appear.
As a rule, all connectors on the router are labeled. It can be written either WAN or Internet. For example, on Tp-Link routers, LAN is usually always yellow, and WAN is blue. You can take a look at.
Here is the correct connection diagram:
So, we checked, if everything is connected correctly, then we will look for a solution to the problem in the router settings.
The most important point that you need to know when setting up any router, and because of which errors with no Internet almost constantly appear after setting up the router, is this correct configuration of the router to work with your Internet provider. If you incorrectly set the Internet (WAN) settings on the router, then the Internet, of course, will not work, and you will see the error “No Internet access.”
Now I will explain in simple language. There is a provider that gives you Internet. You connect this Internet to the router. The router's task is to establish a connection with the provider and distribute the Internet to your devices. If the router cannot connect to the provider, then the Internet will of course not work.
Let's continue to figure it out...
In most cases, this happens because the router settings incorrectly indicate the type of connection that your ISP uses. Or, the Internet connection data is incorrectly specified. Your ISP most likely uses one of these connection methods: Dynamic IP, PPPoE, L2TP, PPTP, or Static IP.
The simplest one is Dynamic IP. The Internet should work immediately after connecting the Internet to the router. If your provider uses Dynamic IP and you see the error “No Internet access” or “Restricted”, then first of all reset the settings on the router. If this does not help, then check whether the connection type is selected on your router: Dynamic IP. I will show you how to do this below.
If your provider uses PPPoE, L2TP, or PPTP, then in addition to selecting one of these connections in the settings, you also need to specify the data for connecting to the provider, which should be given to you when connecting to the Internet. Typically this is: username, password and possibly IP address and server name.
If before purchasing a router, on your computer (if the Internet was connected) there was a high speed connection (for example, Beeline), then after installing and configuring the router it is not needed. It doesn't need to be launched. The router will connect to the provider and simply distribute the Internet via a network cable and Wi-Fi.
And then there are cases when, after installing a router, the Internet only works as long as the computer on which the Internet connection is running is turned on. It should not be.
I think we've sorted this out. I will now show you where on the router to set the parameters for connecting to the provider. Let's look at the most popular manufacturers. You should already know what type of connection you will set and the rest of the data (Username: Password) if they are needed. And they are needed if you have a connection via PPPoE, L2TP, or PPTP.
We will start, as usual, from Tp-Link routers
Go to settings, to the address 192.168.1.1 (or 192.168.0.1). You can take a look. Go to the settings tab Network - WAN. This is where you need to set the parameters. In field WAN Connection Type select the connection type and set the necessary parameters.

When you have set everything, click on the button Connect, the router must connect to the provider. If there is no connection, then check the settings. Don't forget to save everything by clicking the button Save.
Go to the D-link control panel at 192.168.0.1. Look at entering settings.
Then, go to the menu Net - WAN. Click on the button on the right Add. Select the connection type and continue.

Configuring WAN settings on Asus routers
As usual, you need to go to the control panel. I wrote in detail how to enter Asus settings in the article.
In settings, on the left, select "Internet". There you can immediately indicate WAN connection type, and set the required parameters.

Setting up the Tenda router
Go to the settings of the Tenda router at 192.168.0.1, or look at the pictures. Immediately on the main settings page, opposite Access Method You can select the type of WAN connection. Depending on the selected connection, fields for additional parameters will appear below. Where you need to indicate the data that the provider must provide you.

Save the settings by clicking on Ok.
Setting up the Internet on a ZyXEL router
On the Zyxel Keenetic, the connection setup is done in an interesting way, but that’s okay, we’ll figure it out. Open the menu below Internet. Then, if you have a PPPoE, L2TP, or PPTP connection, select the PPPoE/VPN tab and click on the button Add connection.
Specify the type (protocol) and enter the required data (Username: Password).

Specify the connection type on Linksys
In settings(), go to menu item Settings - basic settings. And vice versa "Internet connection type", you need to choose the one that your Internet provider uses. And if necessary, specify the necessary parameters.

Save your settings.
If you have a connection via an ADSL modem, that is, a cable goes from the modem to the router, then you need to select the connection type - Dynamic IP. This is in most cases, it just all depends on the modem settings.
Always try to configure your router according to the instructions. Even if the instructions are not written specifically for your model. The main thing is that the manufacturer matches. The control panels there are almost always the same. See detailed articles on setup on our website; in the “Setting up a router” section, select the manufacturer, then instructions for any model, if yours is not there.
If you have connected everything correctly and set all the settings correctly, but the Internet through the router still does not work, the “No Internet access” error has not disappeared, then you need to rule out problems on the side of the Internet provider. It may even be that the connector on the network cable from the provider has come loose. You can try connecting the Internet directly to your computer and see if it works.
If you are confused about the settings or indicated something wrong, then it is best to reset the settings on your router to factory settings and configure everything again. Some incorrect parameters may hinder you.
Well, there is no need to rule out a faulty router. Different things happen. You can check its operation with another provider, if possible. Or, go to the store and have them check it.
That's all. Ask questions in the comments and share your experience. I'd love to see your comments!
Today we are all highly dependent on the Internet. And when it doesn’t work, panic immediately sets in, your heart sinks into your heels and life seems meaningless. It may be funny to you, but for some it really is.
The user is especially lost when the Internet is connected, but does not work. Today I will tell you why this happens and what to do if this happens to your network.
If you are connected to the Internet, but it is not working, the first thing you need to do is find the cause of the problem. To do this, you need to restart all devices that are connected to the Internet. This means a router, a computer, etc. Most often, such a reboot completely solves all problems with the Internet, and it starts working properly. If, after rebooting the router and computer, you do not get the expected result, move on to the next “therapeutic” procedures.
Today, most people connect to the Internet using a Wi-Fi router. If you have the same, then you need to check whether the Internet access indicator on the router is on or not. For those users who use a TP-Link router, the Internet access signal is marked with a globe icon. On other routers, this signal is most often signed “Internet”.

If the indicator is off, you need to check your router settings. If everything is fine with them, then we call the technical support of our provider and ask why there is no Internet, perhaps just a repair of the highway or network.
But, if the indicator is on, then there is a connection and the provider is not to blame. Check Internet access on other devices. It doesn’t matter what it will be - a phone, a tablet or another laptop. This way you can figure out which direction you should dig next to solve this problem. I’ll say right away that the case when a router is connected to the Internet, which is known to work well, but at the same time it does not distribute it to other devices, is considered a very rare case. The reason for this problem lies in the failure of the router. It's not difficult to fix this. You need to reset all settings to standard and reconfigure it again, remember that after the reset all settings will be lost and the Internet may not work until the router is configured correctly!
Cases often occur when only one device or computer cannot connect to the Internet using a router, but everyone else can easily access it. In this case, you need to look for the cause directly on this device.
If you are connected to the mobile Internet via a USB modem or WiFi module plugged into a USB port, try disconnecting it and reconnecting it. If this doesn't help, try using a different port to connect. Perhaps reinstalling the driver will help you solve this problem.
If the Internet is connected to your PC or laptop, but does not work, and you are absolutely sure that the reason for this is incorrect settings, then you need to perform a series of procedures that will quickly solve your problem.
You need to start reconfiguring by pinging any popular site. To do this, press the combination “Win + R”. This will bring up the “Run” window.
In the text input field, you need to enter the following “cmd” and click on “OK”. If you are not a fan of my site, you can write Google. After that, press enter and wait for the result. If everything is fine, the server will send you something like this:
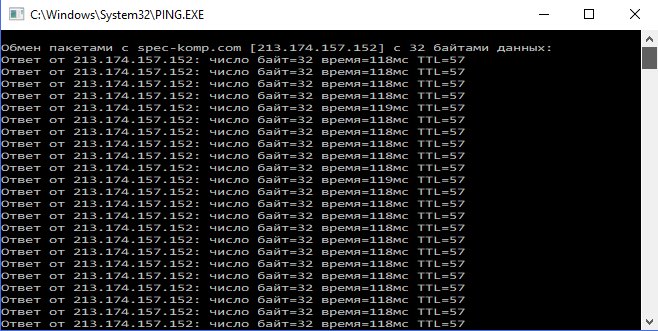
If the response from the server contains the line “The connection check failed to find the nodepec-komp.com. Check the host name and try again,” then you need to type another command, for example “ping .8.8.8.8”. This is the IP address of the public DNS server from Google, which will always be available. If the computer has access to an external network, then the answer will be the same as in the picture above, but with different numbers after “answer from...”.
If a ping passes through an IP address, but does not open in the browser, then most often this indicates that there is an Internet connection, but the network does not work due to incorrect configuration of the network card, namely, the address is not registered in them or the address is entered incorrectly DNS servers. I'll tell you how to fix this a little later.
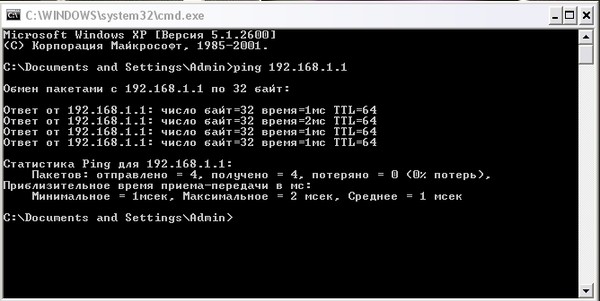
If you observe a different response from the server, then you need to check access to the router. We will also check using ping. You can find out the router's IP address on a sticker that is glued to the back of its case. Most often, the IP address of routers is “192.168.1.1” or “192.168.0.1”. The first address is registered on my router, so I received this answer:
If the router pings, but the Internet node does not, then most likely the reason lies again in the settings of the router or in the router itself.
But if the router is not available for server requests, then there is a reason to go into the settings of the network adapter on the computer. But, before doing this, disable your antivirus and firewall, if you have one. Sometimes it is these two “comrades” that cause problems with the Internet.
If after this the Internet does not work, although there is also a connection, press the key combination “Win + R” again, but now in the “open” field we write “ncpa.cpl.”.
If you have entered everything correctly, the Windows network connections window will open. In it you need to find your active connection and right-click on it, then select “properties”. In the window that opens, look for the line “IP version 4 (TCP/IPv4)” and double-click on it to open the protocol parameters .
Check “Obtain an IP address automatically” and “Obtain a DNS server address automatically”. Click OK and check the result in the browser.
If this does not help, then check the box “Use the following addresses.” You need to register the IP address from the subnet of your router. If it has IP 192.168.0.1, then set the computer to 192.168.0.2. If the router uses 192.168.1.1 , then on the PC it will be 192.168.1.2. Mask 255.255.255.0. You must specify the router address as the gateway. Register it as the preferred DNS server. An alternative DNS can be specified as the server from Google - 8.8.8.8.
In any case, watch my video on speeding up the Internet, if you apply all the settings, the Internet should work.
Increasing Internet speed to the maximum!
I hope that at least one of the methods will definitely help you regain access to the Internet. If none of the options for solving the problem helped you, then you will have to call a specialist who will determine the true cause and solve the problem. But I’m sure it won’t come to that and you’ll fix everything yourself.
By default, when using a Wi-Fi connection from a laptop or computer, the Internet and network should connect automatically. The user does not have to think about what and where to turn on, as when working with wired Internet.
Here, one of the main advantages of this connection is the ability to turn on from the first second, without waiting.
But it also happens that it was not possible to automatically connect to the proxy server. What does it look like and what should a simple newcomer to the Internet community do in this case? The reason for this problem is hidden in the settings for connecting to the proxy server. You could change them:
The complexity of such problems is that with the Internet connected, which will look like it is turned on in the command line, and even torrents will work and Skype can work, but it will become impossible to start working in any window. It will open, but will not load. Everywhere it will be written that there is no connection to the proxy server.
The signature can be in English or Russian. Only one tab or different browsers may not open. Or maybe this error occurs in all browsers.
There is no connection to the proxy server, which just means that somewhere the automatic connection to the network is broken, which does not require human intervention.
No connection to the server
An important note - Problems with automatic connection have nothing to do with the operating system (OS). Therefore, there can be no problems here. The difference will be small only in correcting such a problem on different operating systems -7, or 8, or 10.
In this case, the main thing is not to be hysterical, not to say that repairs will cost a lot of money. And there is no need, in a fit of imbalance and with a hot head, to start with:
To fix connection errors with a proxy server in any browser, the first thing the user should find is simple Settings.
After pressing the button, a window with settings opens. But not all of them may be displayed. Therefore, the user needs to look at the window, and if there is nothing with the proxy server signature, click the Change proxy server settings button. Then the user will see on the screen window in which you should already select change Internet settings.
It will automatically open on the connection option (if not, you need to select it) and then press the button - Network settings.
After that, the user in a new window must check the automatic detection of parameters option and click ok to correct the connection.
And then the apply button is pressed and you can check the error correction. Mozilla works according to a similar scheme. But the end of the procedure is slightly different. Through Settings, find Advanced, then Networks, and then select Configure. Be sure to select the option WITHOUT PROXIES. It will be better this way.
After the user has corrected the network disconnection settings in all browsers, the connection needs to be updated via Windows. To do this, the following sequence of actions is performed:
And now you can try to adjust the automatic connection to networks using the tools available in the OS. To do this, select Start, then Control Panel and Network Control Center.
Network Management Center
Then you need to select - change adapter settings. Then there you will need to move the mouse to the “local network connection” shortcut and select properties after right-clicking.
In the connection to the local network, in the Networks tab, you need to check the box or highlight the line Internet Protocol Version 4 (TCP/IPv4). And as always, click OK.
Then you need to make this line with the connection active, stand on it, and click the Properties button, which is just below. A new window will appear. It must automatically select both IP and DNS addresses.
Just in case, you can also run the following phrase through the command line - ipconfig /flushdns. But this requires administrator rights.
Things will be worse if the automatic settings are lost due to a failure, a power outage, or a virus that has not been completely removed. Then the computer will have to be “treated”. Settings can be lost due to a virus in two cases:
You can fix such errors with the same antivirus. But the program should be simpler so that it does not interfere with the settings, for example, this AVZ.
In this program, you should select restore system settings through “File” and check all the boxes, exactly as in the figure below. Then click Perform the marked operations.
After this, you can reload the browser and try to see if Internet pages open.
As for anti-virus programs themselves, in this case it is better to use one-time scanners, without permanent installation on the computer. It can be:
Another option to fix automatic connection is clean registries.
In the operating line of the OS window, type HKEY_LOCAL_MACHINE\SOFTWARE\Microsoft\WindowsNT\CurrentVersion\Windows\
In the window that opens, you need to check the Appinit_DLLs folder or file. There shouldn't be anything in it!
In OS version 10, this file will be named AutoAdminLogan.
All possible options for fixing connection to the proxy server have been reviewed. If all else fails, then you should call a specialist. This means that something more serious happened to the computer than lost settings.
Another problem with network connections and working on social networks. Very often, when loading sites on the Internet, an annoying window appears with the following content:
Connection failed error
This same error can very often be referred to on the network as connectionfailure error. Such inaccuracies should be kept in mind when searching. This is just that magical option when you can log in to some sites, but on others you get this error. There is most likely no reason for this to be a virus. In most cases, this problem is caused by:
To solve the firewall problem, you will have to turn the firewall on and off. If sites are blocked due to the antivirus being turned on, you will have to disable such blocking on the antivirus. This is what it might look like on Avasta. All you need to do is update your antivirus to remove blocking links.
Updating signatures
And if there is no truth in any of the proposed options, then all that remains is to call the provider and find out if preventive work is being carried out somewhere. Yes, and there is such an option that the wires were cut in the yard or the user did not pay for the services.
Connecting to a computer or laptop network can be done in two ways:
But besides these nuances, there is also the type of operating system that needs to be taken into account. And if the seven and eight with modifications are similar to each other, then the ten may have its own difficulties.
How to connect an Internet connection via a wired cable and via a wireless network for Windows 7 is officially published in great detail and easily accessible on the Windows website. Version 8 needs to be connected to the Internet in much the same way.
Thus, the user will not be confused or lost if suddenly the computer starts swearing about inaccessible pages. It will be enough to first try all the above methods on your own, and only then go to the workshop.
There are cases where users switch to Windows 10 and then face the problem of not being able to connect to the Internet. In the vast majority of cases, incidents occur with a wireless connection when the message “No Internet connection is secure” appears on the screen. Many users do not know what to do, so the information below is relevant.
To troubleshoot connection issues, make sure WiFi is turned on. To do this you need:
Depending on the reason, any of these methods should be able to fix the “Can’t Connect to Network” error message appearing on your Windows 10 laptop screen.
Among the existing reasons for the lack of wireless network connection, the most common are:
Many users are interested in the question of why there is no Internet connection, why Windows 10 is protected and how to fix the situation.
A common connection problem is related to the modem - router - computer system. If problems are detected, it is enough
Clearing and resetting the DNS cache can resolve issues related to:
To reset the cache, you must perform a series of sequential actions:
After these operations, the screen will flash for a short time (a fraction of a second) and the DNS Resolver cleanup program will start.
To resolve network and internet error issues using the troubleshooting tool, you need to:
Note! The troubleshooting window differs depending on the operating system version, but is located at the bottom of the screen

If the problem is caused by the adapter, the message “Cannot connect to this network” will appear on the screen. This means that the network adapter driver is damaged or incompatible with the current version of Windows.
If you cannot connect automatically, that is, using the network driver troubleshooter, you must:
To reinstall you need:
The first step is to make sure that the problem is not coming from your cable modem or Internet provider. Otherwise, this issue can be resolved by talking to the technical service via the hotline.
In the case where the reason for the lack of connection is different, you should:
Setting up a new PPpoE connection includes a number of sequential operations, in particular:

In more than 90% of cases, this problem is solved by rearranging the hardware drivers. Even when the system does not detect any difficulties with the software of the network card and Wi-Fi adapter, it is still recommended to remove them and install them again.
To disable driver updates you need to:
Note! The rollback function begins to function in full form after updating the driver software in the case of an old version. If you do not want to fix the updated driver, you must select the “rollback” function to return to the previous version.
The gpedit.msc command is designed to gain access to local group policy. It has an expanded list of parameters for flexible configuration of Windows operation and limiting the actions of controlled users.
To launch the policy editor you need to:
In the Local Group Policy Editor window that opens, you can
The first section (computer configuration) contains system-wide settings, and the second section contains user settings.
To open the Network Troubleshooter:

If the connection problem cannot be solved, then you should:
If there are no changes, you must follow the following commands:
Once the programs have completed successfully, you should type Exit and press the Enter key to exit the command line window.
Thus, despite the existing cases of lack of open access to the Internet when switching to Windows 10, there are several effective methods to solve problems: disabling and reinstalling drivers, using the Windows tool to remove protection, setting up PPPol and others.


