
Before starting the operating system, a set of firmware called BIOS or modern UEFI is responsible for the initial boot of the computer. At this point, there is not much you can do with the computer, except change the settings. Therefore, as a rule, no one is doing this.
Later, if the system does not perform as expected, or if a new operating system needs to be installed optimally, the BIOS or UEFI settings cannot be bypassed. In this case, the most important points include the settings of the processor, RAM, and boot processes.
UEFI is built completely differently than its predecessor BIOS
Most of the differences are noticeable in appearance: the BIOS is a text interface that is incomprehensible to many users, controlled from the keyboard, while UEFI has acquired a convenient graphical shell and allows you to make settings using the mouse. In addition to BIOS emulation, UEFI has a built-in BIOS compatibility mode and Secure Boot function.
The latter protects your computer from malware that may be loaded along with the OS. In addition, more modern PC firmware provides better hardware support. For example, only with UEFI, you can create hard disk partitions larger than 2 TB.
Last but not least, UEFI offers the ability to remotely turn on and off the computer, manage UEFI settings, and start the operating system.
BIOS and UEFI are configured differently depending on the system. Many computers, after turning on, show a notification that you need to press F2, F8 or Del. Some laptops have special hardware keys for this. Meanwhile, most motherboard and computer manufacturers rely on the firmware from American Megatrends (AMI), so, despite the external differences and slightly different designations, the controls are often similar.
1. Determine the frequency of the processor and RAM
Install the CPU-Z and Prime95 programs to determine if the processor and RAM are running at their optimal speed. In Prime95, click on Options | Torture Test ”to fully load the processor. Then see what frequency CPU-Z displays when you click on “CPU | Clocks | Core Speed ”and whether it corresponds to the nominal speed specified in the processor specifications.
You can find the current clock frequency of the RAM in the CPU-Z on the "Memory" tab in the "DRAM Frequency" section. In the "SPD" tab, you will see the nominal performance of the memory modules.
If the current CPU and RAM clock speeds seem too low, the next step is to check if you can fix it in BIOS / UEFI.
2. Adjust the clock frequency
Restart your computer and bring up the BIOS / UEFI menu. Find your clock speed settings. When using, for example, Asus motherboards, the corresponding submenu is called "Extreme Tweaker".
Most often, you achieve stable operation if, if possible, all values here are set to "Auto". In this case, the RAM and processor operate at the standard rates supported by them and the motherboard.
3. Configuring the system components
Through the BIOS / UEFI menu, you can configure other system components. Among them is the floppy drive controller, which is often not very well configured by default in computers with BIOS: for example, instead of "IDE", here you should select the "AHCI" operating mode.
To do this, you need to follow the path “Main Menu | Configuration Memory "in BIOS or" Advanced | Configuration SATA "to UEFI. You can deactivate unnecessary components like Firewire, COM or LPT connections.

4. Feature of UEFI: Secure Boot
For computers sold with the default Windows 8 operating system, one UEFI setting will most often not only prevent you from installing another operating system (such as Windows 7 or Linux), but also from booting from the Live DVD.
To eliminate this obstacle, change in the UEFI menu “Boot | CSM "option" Launch CSM "to" Enabled ". The Compatibility Support Module ensures that after installing a new operating system, UEFI behaves like the BIOS. But the "Secure Boot" security feature that prevents rootkit attacks will no longer work.

Now it is difficult to find a person who, at least by hearsay, did not know what it was BIOS... Indeed, computers have long and firmly settled in our apartments and offices. And if we take into account the pathological passion of a Russian person to climb into everything according to the slogan "why repair it ?!", then I think everyone's familiar screen BIOS has not raised any special questions for a long time. Judge for yourself - significant changes in BIOS did not bring in for decades - it remained the same outwardly all the time.
Here is blue Award:
But the gray ones Phoenix and AMI:
Several generations of people grew up on them, but outwardly they practically did not change at all. But still, evolution has reached BIOS- appeared EFI followed by UEFI.
EFI (« Yifai» — Extensible Firmware Interface) Is an interface for communication between the operating system and the firmware that controls the hardware at a low level. In other words EFI properly initializes the hardware when the computer is turned on and then transfers control to the operating system. Interfes EFI was originally developed by Intel for Intel-HP Itanium systems in the early 2000s as a replacement for the old BIOS. Indeed, existing hardware limitations made it impossible for large Itanium-based servers to function properly. Several versions have been released EFI, after which Intel introduced this specification into UEFI Forum who is now responsible for the development and promotion of EFI. By the way, the name of the interface was also slightly changed - it turned out to be Unified Extensible Firmware Interface - UEFI... Currently the most current specification UEFI is indexed 2.3.1 .
First, a very significant advantage is the specification UEFI is the only option to support hard drives larger than 2TB.
Second the advantage is that UEFI, unlike the classic BIOS, not just a firmware hardwired into a special chip - it is a whole interface located in the directory / EFI
, which can be located on a chip, on a hard disk partition, or even on a separate removable disk. Those. v UEFI any adapted programs can be added. Already from under UEFI BIOS some manufacturers have the ability to go online. Of course PPPoE or L2TP UEFI will not be able to raise, but getting an IP address via DHCP from a router is quite possible. Accordingly, the possibilities and downloads over the network are expanding.
Third- the ability to integrate drivers into UEFI... This driver will be relevant for any operating system that will be installed on the computer, providing versatility and cross-platform.
Fourth- very nice interface. This is no longer the modest ascetic interface of the old BIOS... For example, the so-called 3D BIOS from GIGABYTE:
Everything is clear, understandable and beautiful.
There is even a choice of language. True, unfortunately, the language of the 6th part of the earth's land is not yet taken into account by not all manufacturers.
Another significant advantage of the new system for many is a much faster loading of the operating system than when using BIOS... True, the operating system must also fully support UEFI... And so far only knows how to do it well Windows 8.
By the configurable parameters themselves and their values UEFI BIOS Is the same BIOS... I will not consider the interface UEFI every vendor - this is not necessary, since the requirements of compliance with the specification do everything UEFI BIOS logically similar, despite the fact that the external interface may differ in the arrangement of elements.
In most cases, the interface UEFI made in such a way that by default only system information and the simplest basic settings are available to the user - boot order, operating mode:
To select the device from which the download will be carried out. Just click the icon Boot Priority and select the desired device from which the download will be carried out.
In some cases, for example, MSI, there may also be tools for quickly overclocking the system:
To go to advanced settings UEFI BIOS, You need to click on the Advanced Mode button.
And here we already see the parameters of the good old BIOS.
In the extended mode, there will definitely be a section responsible for overclocking and operating modes of the processor, memory and power management system. It can be called OC Tweaker, AI Tweaker or H.I.T.
Also, there will definitely be a section Advanced
, consisting of 5-7 sections. Alternatively, some manufacturers, for example Gigabyte, there may be three sections instead of one: System, Peripherals and Power Management.
V System- basic settings of the processor, memory controllers, ports.
Hello friends! In today's article, we install Windows 7 (the instructions are also suitable for Windows 8) on a stationary computer with a GIGABYTE motherboard... In BIOS, we will enable the UEFI interface, that is, when the system is installed, the hard disk will be converted to a GUID (GPT) - the latest standard for the format of partition tables on a physical hard disk. That is, we are with you Making the most of the new GIGABYTE motherboard with UEFI DualBIOS!
All the benefits of the new UEFI BIOS and GUID Partition Table (GPT) hard drives are written in this article. The main advantages are speed, security and work with disk space over 2TB. A simple 3TB hard drive converted into a simple, regular and long-obsolete MBR (Master Boot Record) will only allow you to work with your two terabytes, the rest of the space will not be available to you.
It has long been known that the slowest and most outdated device in our computer is a hard drive, and if in our case we also use an SSD instead of a hard drive, then the installed system will boot up in seconds, the speed of applications installed in the operating system will also increase. ... In other words, you will get the most modern and fastest computer.
The fact is that setting up UEFI DualBIOS on a computer with a GIGABYTE motherboard is slightly different than in the descriptions of these articles. I will say more, the UEFI DualBIOS settings on GIGABYTE motherboards are constantly being updated and changed, so I plan to write a few more articles describing how to install Windows 7, 8 on a computer with a GIGABYTE motherboard and UEFI enabled, as soon as I get my hands on the newest motherboards from this firms.
First of all, in just 5 minutes, we create a bootable UEFI flash drive according to this article - and insert the flash drive into the USB 2.0 port.
When you turn on the computer, immediately press the Delete key and enter GIGABYTE - UEFI DualBIOS
Note: if you get confused in the settings, press the F7 key and the settings will be as they were before your experiments.
Go to the BIOS Features tab
Option Security Option- put in position System.
Right click to enlarge image


Option OS Type(Operating system type) and set it to Windows 8.

Option CSM Support (Compatibility Support)- put in the Always position (always).

Option Boot Mode Selection set UEFI and Legacy boot mode to UEFI or Advanced. You can put UEFI Only - UEFI only.

Option LAN PXE Boot Option ROM- load the operating system over the network set to Disabled.

Option Storage Boot Option Control(boot control) set UEFI Only - Only UEFI or you can set UEFI First - the first UEFI.

Option Other PCI Device ROM Priority we expose UEFI Op ROM.

There is still one setting left. Now we need to set our UEFI flash drive as the first boot device. The flash drive must be inserted into the USB 2.0 port before turning on the computer.
The very last thing. We save our changes in the GIGABYTE UEFI DualBIOS settings, press the F10 key: Save & Exit. The computer saves the BIOS settings and reboots.


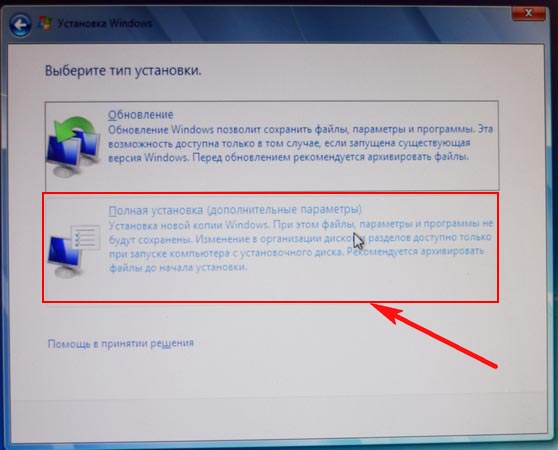
Install

We accept the terms of the agreement

Complete installation.
Please note that my hard drive is MBR (Master Boot Record) and without general formatting, Windows 7 or Windows 8 will not install on the GPT disk,

We will get the error Windows cannot be installed on this disk. The selected disk contains an MBR partition table. On EFI systems, Windows can only be installed on a GPT disk ”!

Therefore, we press Disk Setup and delete all partitions, then either create partitions again or install Windows 7 or Windows 8 directly into the unallocated space.


After installing Windows 7 or Windows 8, we check if the hard drive is converted to GPT.
Start -> Computer -> Management->

Disk management. Right-click on our hard drive and select Properties,

Go to the Volume tab and see that we have succeeded. Partition style: Table with partitions GUID (GUID
You've probably noticed that now in many articles on fixing various errors in Windows or restoring it, it is almost always recommended to use a bootable USB flash drive with operating system installation files or from a LiveCD. And only then they remember using the installation CD.
In principle, this is not surprising, since today DVD drives have already faded into the background, and CD / DVD discs naturally followed. For example, when assembling a new computer, few people additionally buy and install a DVD drive, by the way, in many PCs that are sold already assembled, the drive is also not installed. Well, I generally keep quiet about modern laptops or netbooks, there in most models the drive disappeared for a long time.
Just in this manual, several examples of how to set boot from a USB flash drive in different versions of BIOS will be considered. In this article you can find examples both for the earliest BIOS versions and for some modern UEFI versions from various manufacturers.
Installing a boot from a USB flash drive in different versions of BIOS may differ slightly, but in principle, the algorithm itself is the same for everyone.
In general terms, it looks like this. Well, now let's go through each BIOS version specifically.
AwardBIOS is a pretty old version of BIOS, and today it is very rare to come across, but it does happen sometimes.
So, having entered the BIOS, we need to go to the "" tab.


Initially, the first position will be the hard drive, or if you have several of them, then all hard drives will be displayed first and only then the connected usb device. Here you need to use the key " + »Move the USB stick to the very first line.

Then we return to the previous menu using the key “ Esc"And in the parameter" Firs Boot Device"Select the value" USB-HDD". (By the way, in some versions of this BIOS, such a line may be absent, so you can try to select either USB-FDD or USB-CDROM).

Well, in the parameter " SecondBootDevice "We expose" Harddisk».
Pressing F10, save the settings, restart the computer.
Also, there are several more versions of Pheonix AwardBIOS, in which the very principle of installing a boot from a USB flash drive is similar, but the menu itself is slightly different.
We'll start by checking if the USB controller is directly enabled:

Installing boot from usb flash drive:

By the way, I want to draw your attention to the fact that in this version of BIOS there may be several more options for installing a boot from a USB flash drive, for example:
AMIBIOS is another version of BIOS, which is often found on not the most recent mat. boards. In general, if after getting into the BIOS, its appearance will be the same as in the screenshot below, then to install the USB flash drive as a boot device, you need to follow these steps:

In this BIOS version, also, the flash drive can be found not only in " Removable Drives", But also in" ", so be careful.
Now, let's move on to more modern types of BIOS, which can be found on later models of motherboards from various manufacturers.
Well, right now we'll start with the UEFI BIOS on a Gigabyte motherboard.
So, going into BIOS using the same keys "Delete", "F2" or "Esc", go to the tab " BIOS Features". Here you can see that boot from a flash drive will initially only be available in UEFI mode.
Well, since this option will not work for most, because the regular Legacy mode is more priority, we need to change the ego. To do this, go to the line “ Hard Drive BBS Priorities ".

V " Boot Option # 1"We expose instead of the hard disk, a bootable USB flash drive, respectively in" Boot Option # 2”, The HDD must be installed.

After that, in the previous menu, you can select a USB flash drive as a boot device, but without a UEFI prefix.
There is another boot option, which, as it seems to me, is much easier to use, but its trick is that it serves for a one-time boot from a usb drive, that is, the next time you reboot, you will again have to select boot from it in the same way.
In order to use it, you need to move to the tab " Save & Exit"And in" Boot override»Select the device you need to boot your computer.

The beauty of this option is that it does not require any additional changes in the BIOS settings, and later you simply don’t have to bother returning the boot settings to their original position. By the way, this option is very similar to the same Boot menu, although in this case we will have to go directly to the BIOS.
In the BIOS on motherboards from ASUS, there are also several options for starting a computer from a bootable USB flash drive with Windows.

The principle is the same on more modern motherboards. Below I will show an example on the same ASUS.
After entering BIOS, on the initial screen, we again need to move the priority device to the top with the mouse. Up because this menu moved to the right side and became vertical.

You can also use the boot menu, as I showed in the previous example.
Going to " AdvancedMode ( F7)"And going to the" Boot", You can change the boot priority manually in the" Boot Option Priorities ».

Or just select the device you want to start downloading from it in the section " Boot override", Which is all in the same" Boot "tab.

With regards to the motherboard in MSI, here we can set the boot from the flash drive in two ways.

In general, I hope that you will find the option that suits you, and that you will be able to install the boot from the USB flash drive in your BIOS without any problems.
How to set boot from a USB flash drive in old and modern BIOS versions


